Wednesday, 15 May 2013

Metamorphis: Butterfly and Caterpillar Tutorial

A great little toy to teach the life cycle of a caterpillar to butterfly. The same technique could be used for other metamorphosing creatures, like newts, frogs and other insects.


What you need:
Material scraps-you'll use less than a fat quarter of fabric.
Buttons for eyes [or preferred alternative. I used snaps in this tutorial]
Sewing machine
Needle and cotton

Pattern pieces:
You can download the body pieces here and the wing pieces here. Make sure when you print that you have it set to 100% not scale to fit. Measure the 1 inch square to check it has correctly printed.

You need to cut the following:

Butterfly Body [cut 2]
Butterfly Upper Wings [cut 4]
Butterfly Lower Wings [cut 4]
Caterpillar Body [cut 2]


Cut two body pieces for the caterpillar and butterfly. Add eyes and any other embellishments you want now.

 Cut four of each butterfly wing, so four upper wings and four lower wings. With right sides together sew two matching wings together, leaving an opening along the edge that will attach to the body.

Repeat with the rest of the wings and turn right way out. Once you have all four turned out, match into pairs of one upper and one lower. Position with the upper overlapping the lower and stitch to hold together.

Place on butterfly body and mark the points where the wing will sit with an erasable marker.

Cut between the dots and repeat with the other wings and body.

Push wings through the cut made and fold body together so you have the wings sandwiched between with the wing raw edges protruding through the cut. Stitch across, making sure you catch all the layers. Go about 1/4 inch either side of the cut, tapering to the fold [like a dart]. Repeat with other wings and body.

You now should have two butterfly bodies with wings attached. I like to topstitch under the wing on the body as it helps lift the wings a little higher.

With right sides together pin a caterpillar body to the butterfly body. You want the pins at least 2 1/2 to 3 inches apart. This will become the opening that you turn the finished toy through to change from butterfly to caterpillar, so you don't want it to be too small.

Stitch between the pins, making sure you reverse stitch both ends to they hold nicely. [Ignore the two lines of stitching on the left piece...I didnt catch the butterfly body properly the first time.]

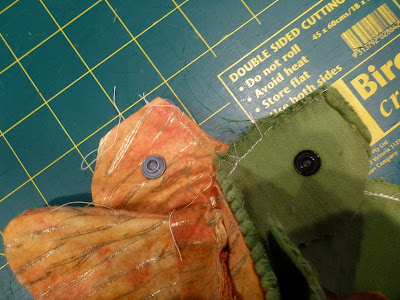
Now it gets a little tricky. You now need to line up the heads of the caterpillar and butterfly with it's corresponding head on the second piece right sides together. Pin the seam join to hold it still and stitch across-it's not a straight seam, more of a 90 degree seam so you will need to re-adjust your fabric [needle down in fabric!] when you get to the middle seam. Also make sure that you meet the seam from the step before or you will end up with a hole where the heads join.

 This is what it should look like from the inside.

And the outside. If you have missed meeting the seam from the previous step a hole will be evident right where all four pieces meet. If this does occur, just resew the last seam closer.

Repeat with the other end. Now the whole bottom [middle] seam should be completed and look something like this.

Sew along the rest of the caterpillar body and clip the dips in the bumps.

Stuff the butterfly wings into the caterpillar body and sew around the butterfly body, leaving a turning hole in the centre of the back.

Turn right side out. You should now have a caterpillar and butterfly joined along the bottom [middle] seam.

And there should be a hole in the back of the butterfly.


 Ladder stitch the opening closed.
 And you are done!

Caterpillar

Turning into...
 A butterfly!


This pattern should work with most fabrics. Because the fabrics I used here have little to no stretch [cord and flannelette], it is fairly fiddly to turn them from one to another-in particular from butterfly to caterpillar. I would think using stretchier fabric would make it a lot easier to turn from one to another. 

Tuesday, 30 April 2013

KCW Wrapup

Wow! KCW is over for now and I still cannot believe what I got done!

My original list of thing I wanted to get done:
On my list of things to make/do this week are:
-Elegance and Elephants's Bubble Shorts and Ruffle Top
-Puperita's Red Riding Hood Jacket
-Overalls-I have yet to find a pattern I like, so I am hoping to trace off a pattern from some overalls she already has which belonged to her dad as a child!
-Finish off the jacket I have already made, just need to add the toggles!
-And if I have time finish off some dresses I have cut out which I plan to donate to Dress a Girl Around the World
Out of the five I achieved four plus heaps more...I never got around to putting the toggles on the jacket!


Over the last week I have made:

-three pairs of overalls from a self drafted pattern [using an old pair as a template/guide] in sizes 1, 2 and 4


-one pair of pyjama pants from a self drafted pattern


-one top using Elegance and Elephants's Ruffle Top pattern

-two pairs of shorts Elegance and Elephants's Bubble Shorts pattern


-one jacket using Puperita's Red Riding Hood jacket pattern


-six dresses using a free pillowcase dress pattern from The Mother Huddle blog


So all up FOURTEEN items of clothing! Not to mention a few little bits and bobs that weren't not children clothing related.

Sunday, 28 April 2013

KCW: Day 7: Passing It On

I can't believe its the last day of KCW! I got a lot more achieved than I thought I would.

I made another pair of overalls, these one will be heading off to a lucky little boy as part of a random act of kindness. I just hope they fit!


I do however need to rehem them before I send them...didn't realise how bad my hemming job was until I looked at the photo!


I used a dark burnt orange cord which I have had for about 10 years [yes I started hoarding material in my early teens!] paired with two gorgeous organic cotton coordinates, one chevron and one with hot air balloons.


Saturday, 27 April 2013

Short Photoshoot with my KCW Day 5 outfit.

Finally got around to getting some half decent photos of Ember wearing the outfit I made on day 5 of the KCW challenge.

Top: Elegance and Elephants Ruffle Top
Shorts: Elegance and Elephants Bubble Shorts


KCW: Day 6: Sewing for Charity

I am very grateful I live in a country where I can buy pretty fabrics and sew for my daughter. As part of this challenge I wanted to make some clothes for underprivileged children.


Originally I was going to donate them to Dress A Girl Around The World Australia, but then I remembered my Aunty and Uncle run a charity in Canada called Agape in Action. They do a lot of work in Africa, especially with children [they run sponsor a child programs similar to World Vision, build schools and orphanages]. 


The dresses are pillowcase dresses, using the free pattern and tutorial from The Mother Huddle. So far I have made two size 4s [the frogs] and four 3Ms [the ducks]. I'm finding it a great way to use up some of my stash which I don't really want, but I'm too lazy to get rid of! I have a large pile of fabric which I have earmarked for charity dresses.


So hopefully these dresses along with a some more will be winging their way over there.


Friday, 26 April 2013

KCW: Day 4 & 5: Chickens and Elephants

I wasn't able to blog yesterday due to having a crazy day! I did manage to get a little sewing done which was nice. The 11:30pm bed time for Ember however, was not fun! 


On day four of the Kids Clothing Week, I finished off the second pair of overalls drafted from my partner Paul's childhood overalls. I graded this pair up a size so they will fit her for longer.


  I fussy cut all the pockets, so each had something different on them. I absolutely love this material!


She wore them around the house today, out feeding the chickens and playing in the pond. They are now back on the sewing table to be repaired... I was lazy and didn't finish them off properly and accidentally tore part of the side seam taking them off her. Oops!


This is my rooster, he has no name yet...and if doesn't stop attacking my legs when I go out, he might end up as a roast! I wish he had inherited his father's personality [who sadly got taken by a fox earlier this year].


These are six of my eight hens. :) They provide us with lots of eggs and manure for the veggie garden. They are also great food scrap disposals!


Day five was all about Elephants! Both fabric and patterns. 


I picked up an adorable set of coordinating fabrics from Spotlight with elephants on it, in pink, blue and brown. I have used another fabric in the same range before but a different colourway .


First up was another pair of Bubble Shorts by Elegance and Elephants, in the coordinating fabrics. These ones worked out a bit better than my first attempt-which was a bit of a failure, as I didn't use the correct seam allowance and ended up needing to cut new waistband and cuff sections! I still had some trouble fitting the cuffs on this pair but it all worked out without needing to recut the cuffs [just the pockets...because I cut them the wrong way on the fabric!].


Secondly, I made Elegance and Elephants' Ruffle Top-the tunic top style. I did the ruffles and tie in the vine print and bound off the neck, arms and hem with the stripes. I love this pattern! Would have to be in my top 3 patterns to make. Took me longer than usual, as I had a little helper constantly giving me pins, fabric scraps and trying to unthread my overlocker most of the time!

I am so pleased with what I have achieved so far this week. I really didn't think I'd actually get a chance to sew every day so far!